How To Tape An Ankle The Right Way (Plus: Kyrie Irving’s Ankle Sprain Injury)
“Like a sprained ankle, it’s nothing to play with!”
Timeless medical advice from one of the brightest minds in healthcare – this classic Drake track popped up on Spotify last week and this seemed like the perfect time to reference it.
While ankle sprains are incredibly common – they account for 1 in every 10 ER visits and 30% of sports-related injuries in young athletes – it’s inadvisable to just walk it off. The truth is, improper treatment of an ankle sprain can lead to serious problems down the road.
If you’ve ever played any kind of organized sports, you’ve probably had coaches and trainers tell you to ‘just suck it up’ and put some ice on an ankle sprain. But those are the types of patients I see 10-15 years down the road at Ascent who have chronic joint instability and degenerative conditions known as osteochondral lesions because the damaged ligaments in their ankles were never given a chance to properly heal.
What happened to Kyrie’s ankle?
The majority of ankle injuries I see at my office are inversion ankle sprains, which occur when the foot turns in to an abnormal degree relative to the lower leg (usually in combination with the foot being pointed downward, also known as plantar flexion). This type of injury accounts for 85% of ankle sprains.
A perfect example of an inversion ankle sprain is what happened Sunday night in Game 4 of the Bucks vs. Nets series. Kyrie Irving went up for a layup late in the first half, came down on Giannis Antetokounmpo’s foot, and turned his ankle about 90 degrees.
It didn’t look good when it happened, and it’s no surprise he’s been ruled out for Game 5.
While x-rays taken Sunday on the All-Star point guard’s ankle were negative for fractures, there’s no timeline for his return to the court. He may or may not be available for the remainder of the series – it all depends on what we refer to as the grade (or severity) of the ankle sprain.
Ankle Sprains = Overstretched Ligaments
Ligaments are like tough rubber bands that help to provide stability to a joint by limiting movement. Sprains happen when one or more ligaments are stretched beyond their normal range.
In an inversion ankle sprain, there are 3 ligaments on the outside of the ankle that can be involved: the anterior talofibular (ATFL), calcaneofibular (CFL) and posterior talofibular ligaments (PTFL). Injury to the ATFL is the most common. When both the ATFL and CFL are both damaged, ankle instability will be more noticeable. The PTFL is the strongest of the three and is usually only damaged in severe ankle injuries.
 – Brookfield Chiropractor")
We use Grade I – III to classify the severity of the injury.
Grade 1 ankle sprains are painful, but they have no increased laxity (sloppiness) when compared with the uninjured side – usually a mild stretching of the ATFL that takes 1-3 weeks to heal.
Grade II ankle sprains are painful and have increased laxity – most often a complete tear of the ATFL and a partial tear of the CFL. These mid-grade sprains can take 3-4 weeks to heal.
Grade III ankle sprains are painful and unstable – usually complete ruptures of both the ATFL and CFL (and sometimes damage to the PTFL as well). These severe injuries can take between 3 and 6 months to fully heal.
Of course, age, health, lifestyle and previous damage to the bones and soft tissues that make up the ankle can all affect how long it takes for an ankle sprain to heal.
Why Tape?
If you’ve sprained your ankle, taping provides compression. One part of the RICE recovery recipe (Rest, Ice, Compression & Elevation), compression decreases inflammation and provides stability, and can help reduce swelling and prevent re-injury.
With each sprain the structure of the ankle becomes more unstable, which in turn results in more sprains. Once you’ve recovered past the acute phase of an ankle sprain, taping it before activity will help to provide the ligaments and muscles with additional stability and support.
But there’s a fine line between a well-taped ankle, and one that’s taped too tight or doesn’t provide the needed support.
There are two types of tape: the first is classic athletic tape, also known as strapping or rigid tape. Athletic tape doesn’t stretch and can actually negatively affect circulation, so it’s only meant to be used for a few hours at most.
The type of tape we’re going to use here is kinesio tape – a stretchy, movable tape that can support the ankle without restricting your range of motion. At Ascent Chiropractic we exclusively use the Rock Tape waterproof brand of kinesio tape because it can provide support for up to 7 days and will stay on even after you’ve showered.
And even though kinesio tape isn’t as rigid as classic athletic tape, you still need to make sure that it’s not so tight that it restricts blood flow. Taping needs to be snug enough to reduce instability, but your joint still needs blood supply, especially when it’s healing.
How To Tape An Inversion Ankle Sprain
Disclaimer: This is not a substitute for medical care. Please consult a doctor or healthcare professional to get a medical diagnosis, rule out any serious complications and get advice on a treatment plan for your particular condition before beginning any self-treatment described here.
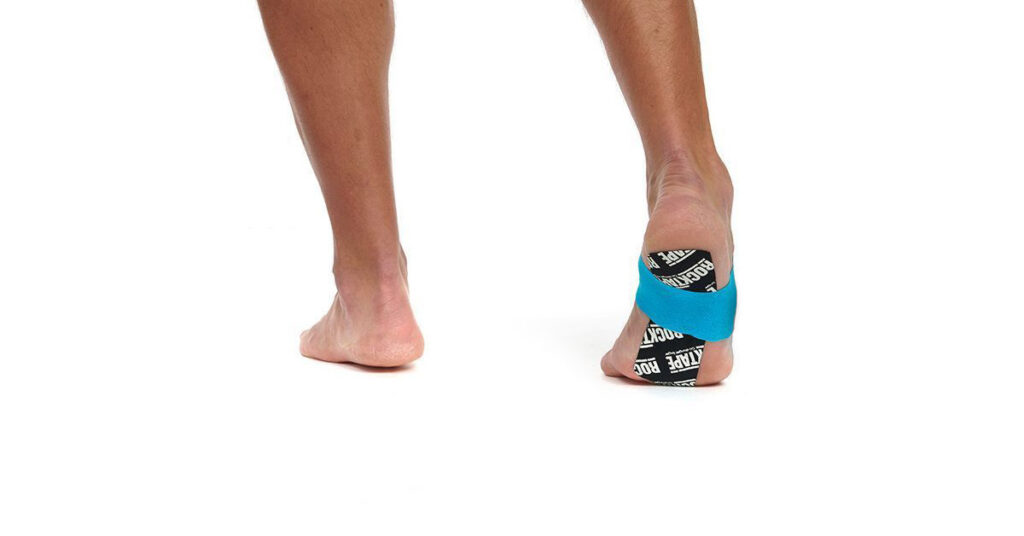
Make sure that your foot and ankle are clean and dry and position your ankle at 90 degrees. We’ll be using a total of four strips of Rock Tape here, but depending on the amount of support your ankle needs, you might only need the first strip, first and second strips, or first through third strips. A good rule of thumb is to apply the strips one at a time, getting up and testing out the level of support provided between each step.
1. For your first strip, you want to anchor one end of the Rock Tape at the medial malleolus (your inside ankle bone) and, making sure there’s zero stretch in the tape, run it to the inside of your heel. As you go under the heel, increase the stretch in the tape to about 70%. When you hit the ankle bone on the outside, reduce the stretch back to zero and run it up the outside of your shin.
Be careful not to touch the adhesive side of the tape with your fingers.
Once the Rock Tape has been applied, give it a bit of a rub. The adhesive is heat-activated, so a little friction will help the tape stick to the skin.
2. For the second anchor, tear the paper tape backing directly in the middle and adhere it right behind the back of the heel with about a 70% stretch. Then wrap each end of the tape back around your heel, coming around under the heel and crossing at the arch. The last two inches of each end should be applied without any stretch.
Your foot should still be able to bend. The tape should be tight enough that it moves with your skin, and should feel supportive.
3. Apply the third strip in the same way, tearing the paper backing in the middle and adhering it with a 70% stretch directly to the bottom of your foot in front of your heel. Wrap each end up around your mid-foot, meeting where the top of your foot hits your shin. Again, the last two inches of tape don’t require any stretch.
4. Finally, take a Y-strip and attach it under the lateral malleolus (outside ankle bone). Pull it across the top of the foot with a 70% stretch and finish by adhering both ends of Y-strip at the inside ball of your foot without any stretch.
Once more give these strips of tape a good rub so that they stick to the anchor pieces.
The Ascent Chiropractic Difference
Of course, taping is just one part of recovery from an ankle sprain. There’s a reason so many athletes choose us – we’re experts in biomechanics and can help you determine the best course of treatment to get you back to 100% as soon as possible. Ready to get started? Make an appointment at Ascent Chiropractic by calling 262-345-4166 or using our online scheduling app.